

How To Install Intellij In Windows
Intellij Idea - Installation and Configuration
In this affiliate, nosotros will understand how to install and configure IntelliJ IDEA. The first step of the process starts with choosing the edition. As per your requirements, you can download community or ultimate edition. Every bit name suggests, community edition is admittedly costless and we can utilise it for commercial development likewise. Nonetheless, ultimate edition is paid version and nosotros tin can evaluate it freely for 30 days.
Installation on Windows
IntelliJ is compatible with almost all versions of Windows prior to 2003. A comprehensive list volition be: Windows x/eight/7/Vista/2003/XP. It is recommended that you shut downwards all other applications before yous install IntelliJ on Windows.
System Requirements
-
A minimum 2 GB of RAM capacity is recommended for seamless functioning.
-
For better visualization, 1024x768 screen resolution is recommended.
-
Minimum 300 MB disk space for installation and additional one GB for cache.
Downloading and Installation
-
Downloading − You can download windows installer from their official website.
-
Installation − Let us begin with the installation followed past the configuration steps. Installation of IntelliJ is similar to other software packages. Only double-click on the installer and follow the on-screen instructions to consummate the installation process.
Installation on Linux
For installation of IntelliJ on Linux platforms, you need to annotation that a 32-bit JDK is not bundled, so a 64-flake system is recommended.
Arrangement Requirements
-
GNOME, KDE or XFCE desktop surroundings
-
Minimum 2 GB of RAM is recommended for seamless usage
-
300 MB of disk space for installation and addition 1 GB for caches
-
For better visualization, 1024x768 screen resolution is recommended
Downloading and Installation
-
Downloading − Yous can download IntelliJ for Linux from their official website.
-
Installation − We accept downloaded tar.gz bundle. Note that in our instance bundle'southward name was ideaIC-2017.2.5.tar.gz. Information technology may change with the edition/version. Please use the appropriate bundle proper noun.
Kickoff extract information technology using following control: $ tar xvf ideaIC-2017.two.5.tar.gz It will create new directory with idea-IC-172.4343.14 name. Now change directory to idea-IC-172.4343.fourteen/bin/ and execute idea.sh vanquish script equally shown below: $ cd idea-IC-172.4343.14/bin/ $ ./idea.sh Follow on-screen instructions to consummate installation procedure.
Configure IntelliJ
The configuration steps are similar on both platforms. To begin configuration, launch IntelliJ application. Optionally, you tin import the existing configuration from this wizard. Click on the next button to continue.
Step1 − If you are using the ultimate edition, so a license activation window volition pop-up. Select evaluate for costless choice and click on the evaluate button equally shown in the following image.

Footstep 2 − Accept the license understanding to proceed and follow on-screen teaching to showtime IntelliJ. You will see the Welcome screen of IntelliJ.
Step three − Now, it is time to configure the Coffee Development Kit (hereafter, we volition refer to it as JDK) with IntelliJ. If JDK is not installed already then follow the instruction equally in here.
-
On the Welcome screen, click on 'configure'
-
Select 'project defaults' from the driblet-downwards listing
-
Select the 'project structure' option

-
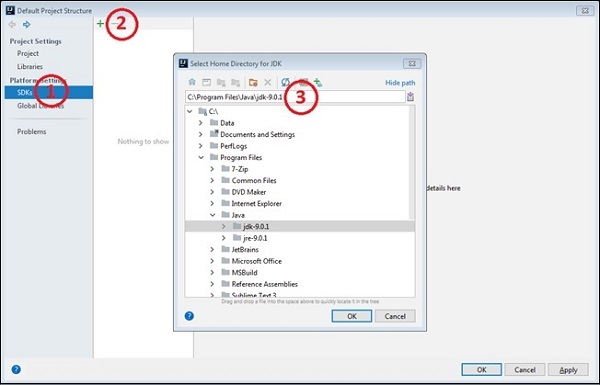
Select the 'SDKs' pick from the 'platform settings' carte.
-
Click on the 'plus' icon and select the 'JDK' option.
-
Select JDK'due south home directory and follow the on-screen instructions.

Source: https://www.tutorialspoint.com/intellij_idea/intellij_idea_installation_and_configuration.htm
Posted by: downingdifebath.blogspot.com
0 Response to "How To Install Intellij In Windows"
Post a Comment